I often tell homeowners that a roof is a breathing system. It might look perfect from the outside, but without vents, your attic traps heat and moisture. I have seen many people struggling because they don’t have proper roof ventilation.
Roof ventilation uses intake and exhaust points to regulate your home’s temperature. I consider roof vents as the home’s lungs. It inhales fresh air at the eaves and exhales heat at the peak. Without this airflow, your attic suffocates, leading to mold and wood rot.
Here I will share my thoughts on how it works, how it improves the home’s temperature, and the different types of roof vents. Let’s get started.
Key Takeaways
- Balance the Circuit: A functional system requires a 50/50 balance between intake vents (at the eaves) and exhaust vents (at the peak) to maintain constant airflow.
- Follow the 1:300 Rule: To meet building codes and maintain your roof warranty, you must provide one square foot of vent area for every 300 square feet of attic floor.
- Prevent Structural Rot: Proper airflow stops condensation on roof decking, preventing the moisture buildup that leads to mold, rusted nails, and wood rot.
- Extend Shingle Life: Ventilation prevents thermal shock and shingle curling by keeping attic temperatures below 150°F during peak summer months.
- Boost Energy Efficiency: Effective venting reduces the HVAC system’s heat load, potentially lowering annual cooling costs by up to 10%.
- Avoid Short-Circuiting: Never mix different exhaust types (like ridge vents with gable vents) on the same roof plane, as this disrupts the natural convection cycle.
- Prioritize Intake Clarity: Use baffles to prevent insulation from clogging your soffits, as blocked intake is the most common cause of attic overheating.
What Roof Vents Do and Why Does it Matter?
A roof vent is a structural opening that allows your attic to exchange trapped air with fresh outside air. It is important to protect your roof deck from structural rot and keep your living spaces comfortable.
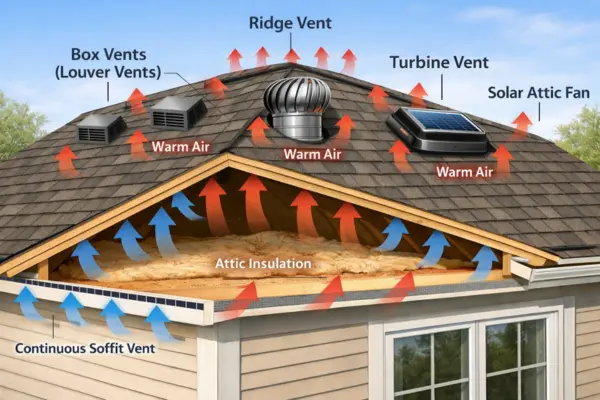
A functional room ventilation system is made of two main parts: Intake and Exhaust. For the air to move, these parts must be balanced. Understanding the roofing basics for homeowners helps to prioritize the roof vents at any cost. Both parts work differently as in-
Intake Vents (The Bottom)
These are located at the lowest part of your roof, usually under the eaves or soffits. Their job is to pull cool, fresh air into the attic.
- Soffit Vents: The most common intake, often made of perforated metal or PVC.
- Fascia Vents: Used when a home has no eaves/soffits. This basically works as passive roof venting.
Exhaust Vents (The Top)
These sit at the highest point of the roof. Because heat rises, these vents allow the hot, stale air to escape.
- Ridge Vents: A continuous vent that runs along the very peak of the roof.
- Box Vents: Individual square units installed near the top.
- Turbines: Spinning vents that use wind to pull air out.
I often find that homeowners have plenty of exhaust but no intake because their insulation covers the soffit vents. If the intake is blocked, the exhaust can not work. This imbalance leads to moisture buildup that requires water damage restoration. Keeping these areas clear is the foundation of effective moisture control.
What are the Most Common Types of Roof Vents?
You can choose from several vent styles, but the most effective system uses a combination of ridge vents for exhaust and soffit vents for intake. Selecting the right type depends on your roof shape, your local climate, and the amount of airflow your attic requires.
Ridge Vents
Ridge vents are best for homes with a long, horizontal peak. Because they work on the principle of hot air rising and wind blowing over the peak creates a vacuum, they provide the most consistent airflow. They are the top choice for asphalt shingles because they do not require cutting multiple holes in your roof deck.
These are generally low-maintenance, but you must ensure the end caps are sealed. If the foam or plastic at the ends of the ridge vent wears out, wind-driven rain can push sideways into your attic.
Continuous Soffit Vent Strip
Continuous soffit strips provide a massive Net Free Area (NFA), allowing air to enter at the lowest point. This creates a scouring effect that pushes heat away from the roof’s wooden structural members.
Use a leaf blower or a stiff brush once a year to clear the small holes. If you have recently had insulation blown in, go into the attic to ensure the baffles have not collapsed or shifted, which would block the air before it even enters.
Static Louver Vents (Box Vents)
These are ideal for roofs with short ridges or multiple gables. If your roof looks like a collection of triangles, a ridge vent would not fit. Box vents allow you to target specific hot zones in your attic. I always install them on the back side of the house so the front looks clean.
These vents rely on a metal or plastic flange tucked under shingles; they are prone to ice damming in the winter. Ensure no debris is sitting on the up-slope side of the vent, as this traps water and leads to leaks.
Turbine Roof Vent (Whirlybirds)
Use these if you live in an area with a steady breeze. A single 12-inch turbine can move over 300 cubic feet of air per minute (CFM). They are an incredible upgrade for older homes that were built before modern ridge venting became standard.
These include a spinning head on a ball-bearing axis. If you hear a squeak, it’s usually a sign that the bearings are drying out. A quick spray of high-quality silicone lubricant (not WD-40, which attracts dust) usually fixes the noise.
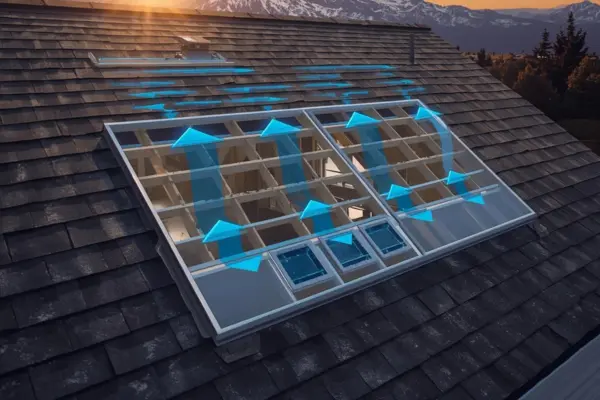
Solar Attic Fans
These are the heavy hitters. While other vents are passive, solar fans force the air out. They are perfect for homes where the attic is so large that natural convection isn’t enough to drop the temperature.
These involve electrical components and a motor. Every spring, ensure the thermal switch is working (the fan should kick on once it hits a certain temperature, usually 80°F to 90°F).
Vents for Unique Roof Shapes
Venting for a Hip Roof: Since hip roofs have very short ridges, ridge vents often aren’t enough. I recommend placing Box Vents on the rear-facing slopes. When we evaluate roof ventilation for hip roofs at Texas Pro Remodeling, we look for ways to maximize exhaust without cluttering the aesthetic lines of the home.
Venting for Shallow Roofs: On low-slope roofs, the chimney effect is weak. Natural airflow is sluggish, which leads to rot. I suggest an Active Solar Fan to force the air exchange, preventing humidity from clinging to the underside of your roof deck.
How Much Does It Cost To Install Roof Vents?
Roof vents cost between $300 and $1,500 for a professional installation. Roof vent costs are driven more by labor and accessibility than by the price of the vents themselves.
Modifying vents into an existing roof typically costs more than installing them during a full replacement because contractors must carefully cut into and reseal your current shingle layers.
Additionally, a steep roof pitch or limited attic crawl space will increase labor time, pushing your total toward the higher end of the range.
| Vent Type | Typical Investment Range (Installed) | Cost Split (Materials vs. Labor) |
| Ridge Vents | $300 – $650 | 30% Materials / 70% Labor |
| Soffit / Intake Vents | $300 – $650 | 20% Materials / 80% Labor |
| Box Vents (Static) | $200 – $500 | 25% Materials / 75% Labor |
| Turbine Vents (Whirlybirds) | $150 – $350 | 40% Materials / 60% Labor |
| Gable Vents | $150 – $500 | 30% Materials / 70% Labor |
| Powered Electric Vents | $200 – $1,200 | 50% Materials / 50% Labor |
| Solar Powered Vents | $300 – $1,450 | 60% Materials / 40% Labor |
How Do Attic Vents Impact Your Home’s Performance?
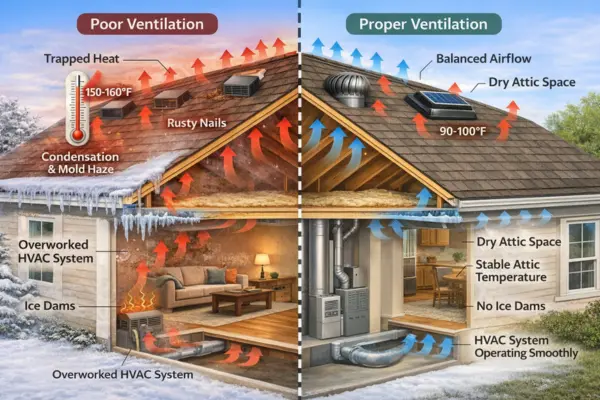
Understanding how air moves through your home is the difference between a roof that lasts decades and one that fails in years. If you can spot the hot attic problem and utilize it efficiently, it can save your energy and monthly utility bills.
How to Identify Signs of a Hot Attic Problem?
The most common sign of poor ventilation is a massive spike in your upstairs temperature during the summer.
I tell my clients to watch for these signs that their attic is under-ventilated:
- Hot attic problem: You notice a wall of heat when you open your attic hatch.
- Musty attic odor: This indicates trapped moisture and a high mold risk in the attic.
- Rusty nails in the attic: When humidity is trapped, it condenses on metal nails.
- Ice dams: Thick ridges of ice on your gutters show attic heat buildup.
Proper ventilation prevents ice dams by keeping the roof deck cold. Just as the purpose of the gutters on a home is to direct water away from the foundation, these vents direct damaging heat away from your rafters.
Does Attic Ventilation Impact Utility Bills?
A vented attic reduces HVAC load. Sealing air leaks around your home and adding insulation can help your home be more comfortable and energy efficient while providing up to 10% savings on your annual energy bills.
I have seen AC units fail five years early because they were struggling to cool a house with a 160°F attic.
Perfect ventilation keeps the temperature difference manageable for your HVAC system. Understanding how your roof affects your utility bill can help you to save your budget every month.
Can I Install These Vents Myself?
Yes, you can install some vents as a DIY project if you have basic construction experience and the right safety equipment. Tackling intake vents from a ladder at the eaves or installing baffles inside the attic is a common DIY task. Follow these steps to install vents:
- Use the 1:300 rule to determine your required Net Free Area (NFA). For every 300 square feet of attic floor, you need one square foot of vent space, split equally between intake and exhaust.
- Check your eaves or soffits. In my experience, the most common hot-attic issue is insulation blocking airflow. Install baffles to keep the path clear.
- Choose a shingle-over ridge vent at the peak and matching fascia intake vents, or soffit vents at the bottom, to create a balanced circuit.
- If you are tackling this during an exterior remodeling project, ensure the proper ridge vent cut width is maintained. Use high-quality vent flashing details and replace any ageing boot flashing to prevent leaks.
- Once installed, check the temperature upstairs. Adding vents helps a hot second floor feel noticeably cooler almost immediately by reducing the heat load.
- Lastly, you can perform a light test from inside the attic. If I can not see daylight shining through the intake vents at the eaves, air is not getting in.
I recommend hiring a contractor for steep pitches (7/12 or higher) that require fall protection or ridge cuts that can compromise structural integrity. Avoid DIY power or solar fan installs, as they require specialised flashing and electrical skills to prevent leaks.
A professional ensures your airflow math is correct, keeping your manufacturer’s warranty fully intact. While you can save on labor costs upfront, a DIY error that results in a denied warranty claim or a structural leak often costs far more than a professional installation.
What Are the Common Installation Mistakes That Cause Leaks?
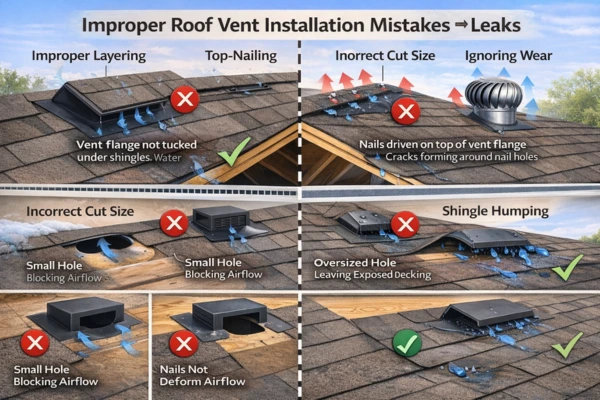
Leaks usually occur when a vent is not properly integrated with shingles or when flashing is improperly installed. Even a high-end vent will fail if it fights against the natural flow of water down your roof. These are the common mistakes that can cause leaks in the roof vents.
- Improper Layering: Failing to tuck the vent flange under the shingles above it creates a direct path for water to enter.
- Top-Nailing: Nailing the vent flange on top of shingles and relying on caulk to seal the heads is a major error. As caulk cracks over time, water seeps into the nail holes.
- Incorrect Cut Size: A hole cut too small blocks airflow, while one cut too large leaves no solid deck for nailing the flashing securely.
- Ignoring Wear: Many homeowners overlook storm damage to roof vents, allowing small cracks to evolve into major structural leaks.
I always check for shingles humping around a vent. This happens when the vent is nailed too tightly to the deck without allowing for expansion. It creates a gap in the shingles where wind-driven rain can easily dive in.
How Do You Perform a Roof Health Check?
You can perform a roof health check by observing the temperature, mold growth, or leaks. Following this easy step-by-step guide during a roof inspection can ensure proper maintenance.
- Monitor the temperature: If your attic is more than 20 degrees hotter than the outside air, your exhaust system is likely failing.
- Conduct a light test: Turn off the attic lights during the day. You should see daylight glowing at the eaves and ridge; if it’s dark, your vents are obstructed. It will also help you to spot roof leaks in your home.
- Identify moisture damage: Use a flashlight to search for dark wood stains, white mold, or rusted nail heads. It’s a classic sign of roof decking condensation.
- Check for obstructions: Look for bird nests or insulation that blocks your soffit intake. The air should smell fresh, not musty.
- Touch the ceiling: Feel your top-floor ceiling. If it feels warm to the touch, your attic is acting like a radiator.
During a professional roofing and repair assessment, I check for frosting on the underside of the roof deck in winter. If ice crystals are present on the plywood, it’s a smoking gun for poor ventilation. This frost eventually melts and mimics a roof leak, but the real issue is trapped humidity that hasn’t been exhausted properly.
Final Thoughts
Your roof is more than just shingles; it is a breathing system that protects your entire investment. By balancing your intake and exhaust, you prevent mold, lower energy costs, and ensure your warranty remains valid.
At Texas Pro Remodeling, we believe that a well-ventilated home is a healthier home for you and your family. Now that you know how to perform a health check and spot signs of poor airflow, don’t leave your home’s safety to chance.
Is your attic breathing correctly? Contact us today for a professional ventilation audit!
Frequently Asked Questions
How many roof vents do I need for a 2,000 sq ft house?
For a 2,000 sq ft attic, you need approximately 6.7 square feet of total Net Free Area (NFA). To maintain balance, you should install 3.35 sq ft of intake at the eaves and 3.35 sq ft of exhaust at the peak to ensure no dead air zones exist.
Do roof vents make my house colder in the winter?
No. Your insulation, not the roof vent, determines your home’s warmth; vents simply keep the attic temperature close to the outdoors to prevent moisture buildup and ice dams without affecting your living space.
Does poor ventilation void my shingle warranty?
Yes. Most manufacturers require a balanced 1:300 ventilation ratio to maintain coverage; without it, trapped heat causes shingles to curl and fail prematurely, leading to a denied claim.
Can I tell if my roof vents are clogged from the outside?
Yes. Look for dark streaks or staining around vent openings, which indicate trapped moisture, or check your eaves for birds’ nests and loose mesh that suggest a blocked intake.