I heard many homeowners feel frustrated when their lifelong floors gap or buckle just months after installation. These failures usually stem from small mistakes made before the first board is laid.
Vinyl plank flooring issues like gapping, peaking, or clicking happen when the subfloor is uneven or when expansion gaps are missing. These issues can be avoided and fixed by following easy guidelines.
I will explain how to identify these specific causes and fix them correctly. Follow this guide to lock the planks in place and eliminate everyday problems.
|
Key Takeaways
|
What are the Most Common Vinyl Plank Flooring Problems?
The most common problems are gaps between boards, protruding edges, and surface bumps.
These usually happen because the room was too hot or the subfloor was not flat. Vinyl floors fail if you do not prepare correctly. These early checks make it easier to fix flooring problems before gaps, buckling, or joint failures spread across the room.
Subfloor Issues
A bumpy or wet subfloor can cause vinyl planks to bounce, click, or show surface lumps. You must ensure the base is flat and dry to prevent the joints from breaking.
I always recommend checking the floor underneath.
If the base is not flat, you will see telegraphing, which is when dirt or bumps show through the vinyl. High moisture or a wavy floor causes the planks to move too much, which can snap the locking system and cause the edges to curl up.
It is also important to prevent condensation under vinyl flooring, as trapped moisture can warp planks and damage adhesives.
Gaps, Buckling, and Peaking
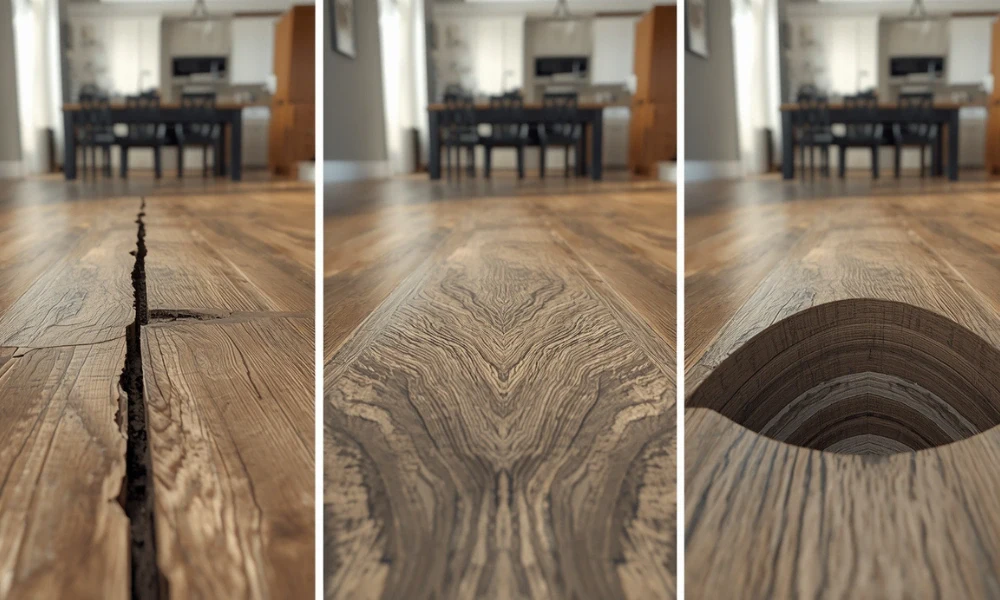
These common issues occur when the floor cannot move freely as a single unit, usually due to temperature changes or improper spacing.
- Floor Gaps
Gaps happen when planks shrink due to temperature changes or a lack of acclimation before installation. I have noticed that gaps often appear when planks are not acclimated to the room’s temperature.
When the material contracts, the locking joints pull apart, leaving visible gaps between the boards. Skipping the acclimation period causes planks to shrink when laid, leading to end-joint failure.
Without enough room to move, the floor pulls away from itself rather than shifting as a single unit, creating wide gaps across the surface.
A homeowner in Dallas noticed gaps forming along the ends of the planks just a few weeks after installation.
The planks were not acclimated to the room’s temperature and humidity before installation, leading to shrinkage and joint separation.
- Buckling and Peaking
Floors lift or peak at the seams when they expand and run out of room at the walls. I often noticed high heat from sunlight or UV exposure triggers temperature expansion.
Since the floor is a floating system, this thermal movement causes the boards to push against each other.
This pressure forces the edges of the planks upward because they have nowhere else to go. It results in uneven ridges across the room.
In a Plano kitchen, a vinyl plank floor began peeling along the walls after a heatwave. The floating floor had been installed without the proper 1/4-inch expansion gap, and the boards expanded under intense sunlight, forcing the edges upward
Installation Mistakes
Installation issues occur when planks are handled too roughly or laid out in a weak, repeating pattern. Poor handling and weak layouts damage the floor’s structure, resulting in gaps and an unprofessional look.
Improper subfloor preparation can cause bubbling. It is one of the most common issues found in nearly 48% of cases of solid or sheet vinyl installations.
Here are the most common mistakes:
- Damaged Locking Clips: Forcing boards together snaps the delicate plastic edges. These broken clips prevent the planks from staying securely locked.
- Heavy Hammer Impact: Using a metal hammer instead of a rubber mallet shatters the plastic tongue-and-groove joints, causing them to drift apart shortly after the job is done.
- Misaligned Joints: Small factory defects or debris inside the groove prevent a tight seal, leading to visible lines and unstable boards.
Scratches and Dents
Surface damage occurs when the wear layer is too thin for the room’s activity or the furniture’s weight. Many surface-damage complaints could be avoided if homeowners took time to check before buying flooring and matched the wear layer to the room’s traffic level.
Grit and heavy objects quickly ruin the finish on low-quality boards.
Most wear layer complaints involve thin products in busy areas. Scratches and scuff marks appear from dragging heavy items, while denting occurs when heavy furniture legs crush the material over time.
Many vinyl planks feature micro-bevel edges that can hide minor gaps but may also trap dirt if the boards shift or buckle.
A family in Arlington noticed deep dents under the dining table and scuff marks in the hallway. They had moved a heavy buffet without felt pads on the legs, and constant foot traffic in busy areas worsened surface scratches.
Stains, Fading, and Cleaning Damage
Chemical reactions, sun exposure, and the wrong cleaning tools can permanently damage the boards’ color and surface. These issues often cause irreversible staining or warping.
Improper care and environmental factors lead to several common problems:
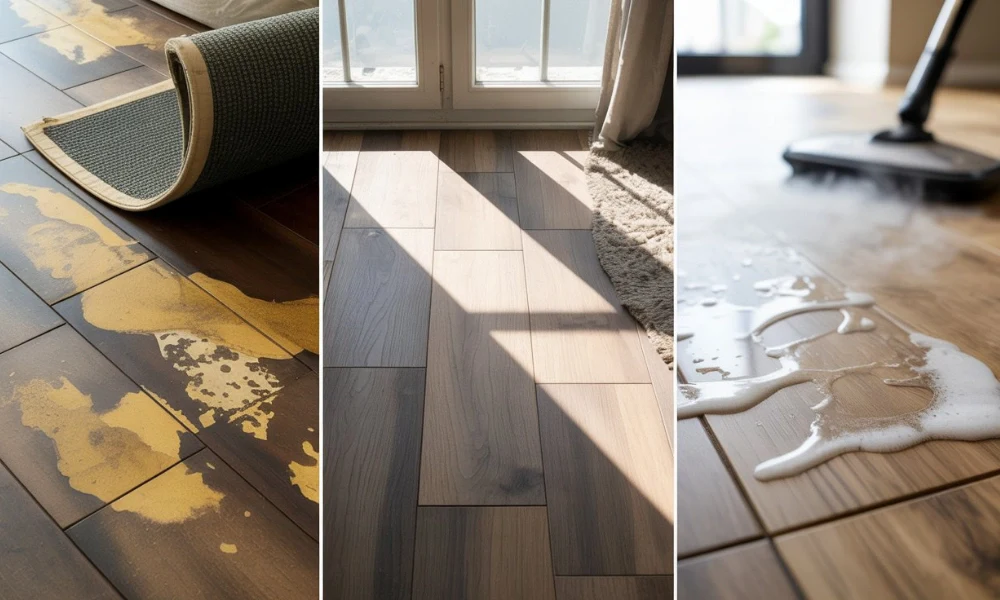
- Discoloration: Yellowing occurs when rubber-backed rugs react chemically with the floor.
- Fading: Long-term UV exposure from sunlight bleaches the boards’ color.
- Water Damage: Steam mops force heat into joints, melting the glue and causing failure.
- Surface Buildup: Wax-based cleaners leave a dull film that is very difficult to remove.
In a basement in Frisco, a vinyl plank floor began warping near the laundry area.
A minor leak under the washing machine led to trapped moisture beneath the planks, demonstrating how even small water sources can cause significant damage if left unaddressed.
How to Avoid Vinyl Plank Problems?
Most vinyl plank failures are preventable if you follow the correct preparation and protection steps before and during installation.
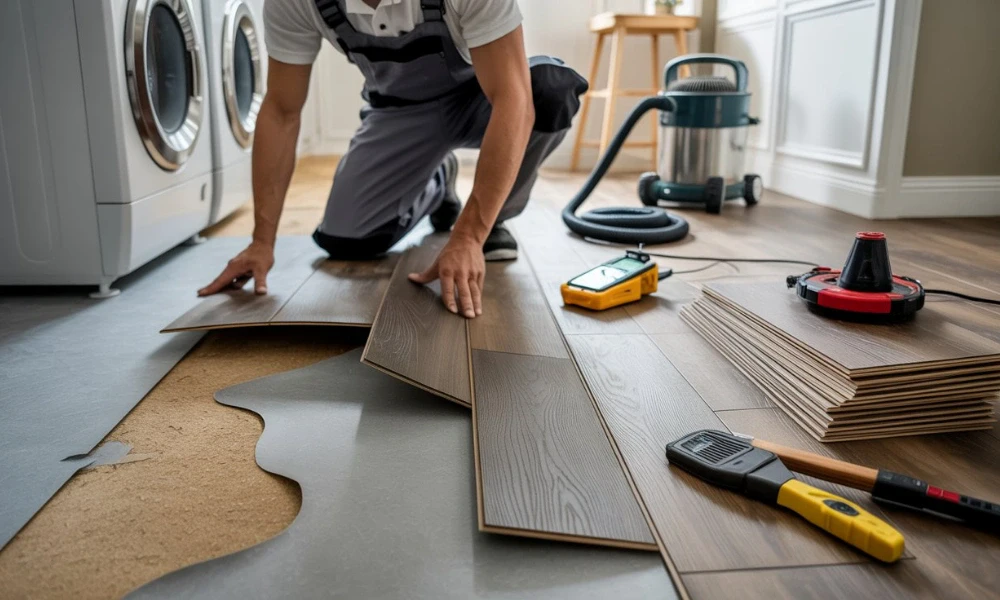
Preparing Subfloor
Grind high spots and fill low dips to ensure the base is flat within 3/16 of an inch. If installing over existing vinyl or tile, ensure the subfloor is stable and level, as uneven surfaces or loose tiles can cause gaps and locking joint issues.
Different vinyl plank cores, such as rigid core vinyl, SPC core, or WPC core, have unique stability and expansion needs, so make sure to follow installation requirements for your specific type.
Follow Acclimation and Spacing Rules
Place the boards in the room for 48 hours to adjust to the temperature. During installation, maintain a 1/4-inch expansion gap at the walls to allow the floor to move freely.
Keeping in mind that vinyl plank flooring is tolerant to heat and humidity helps prevent shrinkage, expansion, and joint failure over time. We recommend maintaining proper expansion gaps and controlling room temperature.
Placing Floor Following the Correct Layout
Stagger your seams at least 8 inches apart and avoid H-joints (seams aligned like a grid) to create a strong, interlocking structure that won’t slide or separate.
If using glue-down LVP, ensure the subfloor is completely clean and smooth to prevent adhesive failure and buckling. Some products, like loose lay vinyl plank, rely on weight and friction rather than adhesives, making proper placement and floor leveling critical.
Surface Protection
Choose planks with a wear layer of 20 mils or higher. Apply thick felt pads to all furniture legs immediately after the floor is installed to prevent dents and deep scratches.
Protect your floor from rolling loads, office casters, and chairs by using chair mats or thick felt pads to prevent dents and scratches. You can avoid dents by using thick felt pads under heavy furniture. We always suggest choosing a thicker wear layer for high-traffic zones.
Ensuring Proper Maintenance
Only use a pH-neutral cleaner and a damp microfiber mop. Strictly avoid steam mops, as high heat can warp the planks and melt the internal adhesive. New vinyl planks may off-gas VOCs for a few days, so keeping the room ventilated helps maintain a healthy environment.
Choosing a finish that hides wear better is something to consider before choosing glossy floors, especially in high-traffic areas.
| Note: Never use steam mops on vinyl planks. While they are great for tile, the intense heat can warp the vinyl layers and melt the internal adhesive, leading to permanent buckling that no repair kit can fix. |
How to Fix Vinyl Plank Problems?
If damage has already occurred, use these specific methods to restore your floor’s appearance and stability.
Fix Gaps
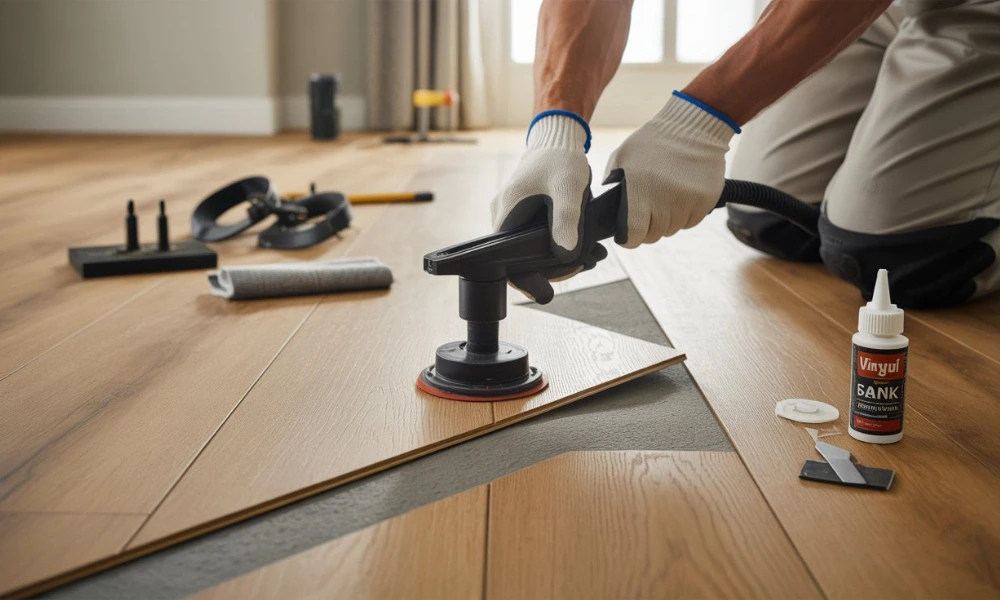
Use a suction cup tool (floor gap fixer) to slide separated boards back into position. Apply a drop of vinyl-safe adhesive in the groove for a permanent hold.
At Texas Pro Remodeling, we often find the common gap issues in most homes. We use this quick fix to keep the boards attached to the floor. You can fix small gaps using a vinyl-safe adhesive or a gap tool. But it is better to call professionals for the large gaps.
Repair Broken Joints
For clicking sounds or broken click-locks, use a glue-assist method. Apply a thin bead of floor-safe super glue into the groove to manually bond the pieces where the locking mechanism has failed.
Moisture Damage Fix
Identify and stop the water source first. Once the area is completely dry, you must replace warped or curled boards, as they will not return to their original flat shape.
In severe cases, you may need water damage restoration to fully dry the subfloor and surrounding areas before replacing warped boards.
The EPA recommends maintaining indoor humidity between 30–60% to reduce moisture‑related flooring issues and keep your vinyl planks stable. You should monitor humidity levels to prevent condensation under floors.
Stains and Discoloration Remedies
Lift tough food stains with a paste of one part baking soda and two parts water. If the floor has yellowed from rubber mats or faded from UV exposure, the damage is permanent and requires board replacement.
What Does Vinyl Plank Repair Cost?
Small DIY fixes usually cost under $50, whereas hiring a professional typically ranges from $150 to $500, depending on the complexity and labor required.
The price fluctuates based on the materials needed and the time involved. Filling a minor scratch with a wax kit is inexpensive, but if a professional has to disassemble multiple rows to replace a single center plank, the labor cost increases significantly.
| Repair Type | DIY Cost | Professional Cost |
| Gaps and Joints | $15 – $30 | $150 – $250 |
| Scratches or Stains | $10 – $25 | $100 – $200 |
| Plank Replacement | $20 – $50 | $250 – $500 |
While DIY is cheaper, you should seek professional help if you are inexperienced; a mistake during a complex repair can permanently damage your floor and lead to much higher replacement costs.
Experienced flooring services help prevent mistakes when repairing gaps, replacing boards, or fixing joint issues.
| Warning: Improper DIY repairs or unapproved glues can instantly void your warranty. Check your warranty exclusions list; most manufacturers deny claims for any boards modified or repaired by an unlicensed professional. |
Final Thoughts
Vinyl plank floors are durable and stylish if you prep the subfloor correctly and leave enough space for expansion. Fixing small issues early and following the manufacturer’s rules helps you avoid common problems like gaps and warping.
Taking these simple steps keeps your floor looking great for years to come. Make sure your vinyl floors stay flawless for years. Contact us at Texas Pro Remodeling for guidance you can trust.
Frequently Asked Questions
How long do vinyl floors last?
A high-quality vinyl floor typically lasts between 10 and 20 years with proper maintenance. The lifespan depends on the thickness of the wear layer and the amount of daily foot traffic it handles.
Can you put heavy furniture on vinyl planks?
You can place heavy furniture on vinyl as long as you use wide felt protectors to spread the weight. This prevents permanent dents and allows the floating floor to expand and contract naturally.
Can you install vinyl planks over radiant heating systems?
You can use vinyl planks with radiant heat if the system is embedded in the subfloor and kept below 85°F. Exceeding this temperature limit can soften the vinyl core, leading to structural warping or adhesive failure.
Is it possible to paint or restain vinyl flooring?
No, you cannot paint or stain vinyl planks because the non-porous wear layer prevents the liquid from bonding. Attempting to coat the surface will result in peeling, bubbling, and a permanent loss of the original floor’s texture.
What rug should I use to avoid yellow stains?
Use rugs with natural fiber backings like cotton, jute, or woven wool, or choose synthetic pads specifically labeled as vinyl-safe or LVP-compatible. These materials are breathable and lack the chemicals found in rubber or latex that cause permanent discoloration.