A brown stain on your ceiling signals a problem that needs attention immediately. Water damage spreads fast. Moreover, it often hides behind walls before it becomes visible. At Texas Pro Remodeling, we know that finding the source of roof leaks early and other roofing basics saves you money and stress.
This guide helps you act like a pro. We will show you how to trace leaks, check your attic, and decide when to call for help. Whether you live in a townhouse or a single-family home in Dallas, you can stop the water today.
Key Takeaways
- Look Higher Up: Water travels down beams. The hole in your roof is usually higher up than the stain on your ceiling.
- Start in the Attic: It is safer to find leaks here than to climb on the roof. Look for rusty nails or wet insulation.
- Texas Heat Cracks Seals: The hot DFW sun destroys rubber pipe boots. This is the #1 cause of leaks here, not just old shingles.
- Townhouse Proof: If you share a wall, you need a professional report. It proves whose roof is actually leaking, so you don’t pay for your neighbor’s mess.
- Stop the Damage: If your ceiling paint bubbles, poke a small hole to drain the water. This saves your drywall from collapsing.
The “Water Travels” Rule: The Leak Is Not Always Where You Think

You might see a drip in your living room, but the hole in your roof could be twenty feet away. This confuses many homeowners. Water follows the path of least resistance. It flows along rafters and beams until it hits a low point. Then, it drips.
We call this “traveling water.” When you try spotting roof leaks in your home, look higher up the roof slope from the interior stain. Addressing only the spot directly above the leak usually leaves the real leak entry point open.
Pro Tip:
Gravity guides the water. If your roof is slanted, the leak source is almost always higher than the stain on your ceiling.
Common Signs of Roof Leaks
Before you start your investigation, you need to know what to look for inside your home. Your house often warns you about a leak before water actually drips on your head.
- Water Stains: Look for brown, circular rings or discoloration on your ceiling or walls.
- Peeling Paint: Moisture trapped behind the paint causes it to bubble, peel, or crack.
- Musty Odors: A persistent damp smell often indicates hidden mold or wet insulation in the attic.
- Damp Spots: Darker patches on your ceiling that may not drip yet but feel cool or damp to the touch.
If you find any of these common signs, follow the phases to find the leaks. These are my expert-tested opinions to find leaks effectively.
False Alarms: Is It Really the Roof?
Not every ceiling stain comes from the roof. Before you climb into the attic, rule out these two common impostors to save time and money.
- The AC Condensation Test: In DFW summers, air conditioners work hard. If your unit is in the attic, the drip pan can overflow if the drain line clogs.
- The Clue: If the leak happens on a hot, sunny day, it is likely your HVAC system, not your roof.
- The Plumbing Check: If a bathroom is directly above the stain, check your pipes.
- The Clue: Does it drip continuously regardless of the weather? Or only when someone takes a shower? Roof leaks typically happen only during or after rain.
Phase 1: The Attic Inspection (Your First Move)
Grab a bright flashlight and head to the attic. This is where you find the clues. A roof inspection with attic check spots trouble effectively without the risk of climbing on the roof.
What to Look For
I recommend you look for these signs during the day:
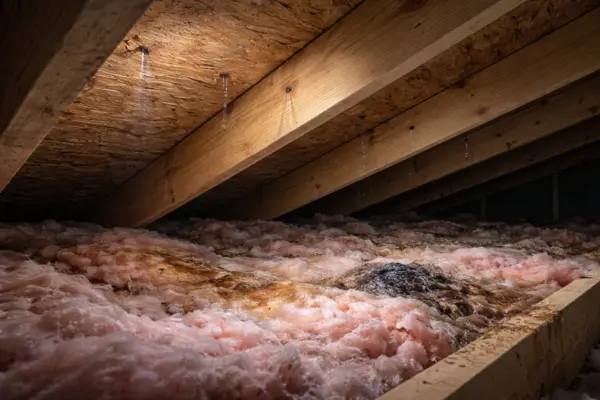
- Shiners: Look for nails poking through the roof decking that look frosted or rusty. This happens when cold air meets moist attic air.
- Rafter Staining: Dark streaks on the wood framing show where water ran down.
- Insulation Damage: Matting or compressed insulation often means water hit it. A simple insulation level check can reveal these low spots.
- Daylight: Turn off your flashlight. If you see sunlight peeking through the roof boards (sheathing), water can get in there too.
The Garden Hose Test
If the attic is dry but the leak persists, try the hose method. You need two people. One person stays inside to watch the ceiling. The other goes on the roof with a garden hose.
Start low. Spray the roof zone just above the drip edge and gutter line first. Then, slowly move up the slope. This isolates the leak. Starting high allows the water to run down and hide the true source.
Safety First: The Rules of the Roof
Your safety matters more than finding the leak. If you decide to climb up, please follow these critical rules.
- Ladder Logic: Place your ladder on firm, level ground. Extend it three feet past the roof edge. This matches OSHA ladder safety standards.
- Footwear: Wear shoes with soft rubber soles for traction.
- The “Stay Off” Rule: If the roof is steep or wet, stay on the ground. Wet shingles act like ice. Call us instead.
Phase 2: Common Suspects in DFW
In DFW and North Texas, our weather is tough. We have intense heat and sudden storms. This “thermal shock” causes materials to expand and contract, breaking seals.
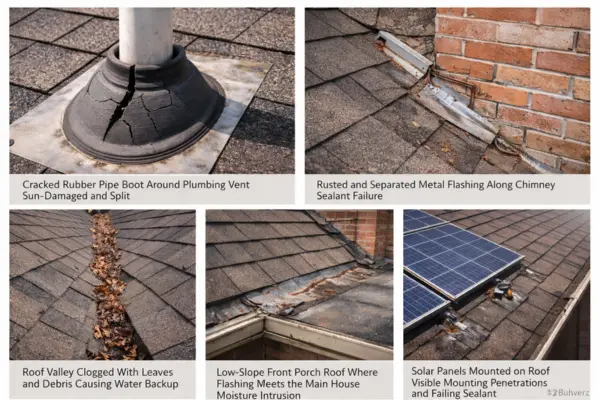
1. The Pipe Boot Split
Look at the rubber collar (or pipe boot) around the plumbing pipes sticking out of your roof. The Texas sun cooks this rubber. It cracks and splits over time. A pipe boot split stands as the most common cause of leaks I encounter.
2. Flashing Failures
Metal flashing protects the joints of your roof. Check the step flashing along the walls and the counter flashing on the chimney. If the sealant-shrinkage occurs or the metal rusts, water enters.
A chimney cricket (a small diverter roof behind the chimney) is also a key spot to check for debris scouring or blockages.
3. Valleys and Gutters
Your roof valleys channel a lot of water. If they get clogged with leaves, water backs up under the shingles. This is why understanding roof vents and keeping drainage clear is vital. Similarly, granule accumulation in gutters slows down water flow.
The purpose of the gutter is to protect your foundation. But if they overflow, they push water into yourfascia boards.
4. Porch Roof Leaks
Do you notice moisture over your front porch? Porch roofs often have a lower slope. They rely heavily on the flashing where the porch meets the main house. If this wall-to-roof joint fails, you will see water on the porch ceiling.
5. Solar Panel Penetrations
Solar panels are fantastic. But the bolts that hold them go through your roof. If the installer missed a rafter or the sealant failed, water enters. While the panels themselves rarely leak, the roof penetrations for the mounts remain vulnerable.
Phase 3: Subtle Signs of a Failing Roof (Exterior)
Sometimes leaks appear without a visible drip inside. You might see subtle clues on the outside that your roof is nearing the end of its remaining service life. These signs are:
- Shingle Blistering: Bubbles on the shingle surface from trapped heat.
- Granule Loss: Bald spots on shingles mean the asphalt is exposed to the sun. This is known as asphalt mat exposure.
- Creased Shingles: Wind pushes shingles up and bends them. Shingle creasing breaks the seal.
- Soft Decking: If you walk on the roof and the deck feels spongy (soft decking underfoot), rot or deck delamination is likely present.
Using tools like a moisture meter inside or an infrared camera scan can help you find hidden wet spots behind walls.
Phase 4: Immediate Fixes and Insurance
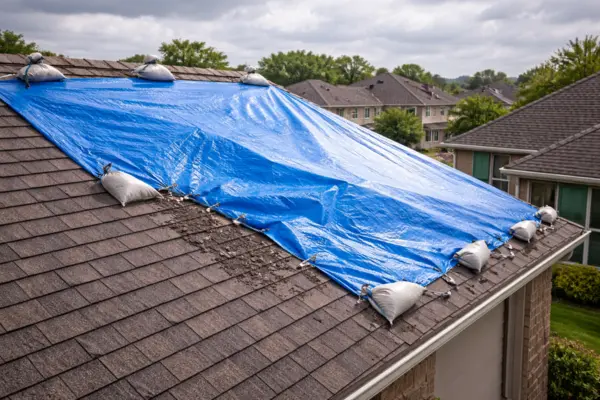
If water is pouring in right now, you need to act.
- Relieve the Pressure: If water bubbles behind the paint, poke a small hole in the center with a screwdriver. Catch the water in a bucket. This saves the drywall.
- Tarp It: If safe, cover the area with a tarp.
- Document It: Take photos of the damage for your insurance.
Dealing with Neighbors (Townhouses)
Shared walls in townhouses can make leaks tricky. The leak can start on your neighbor’s side, but damage your unit. A professional roof inspection report with photos can prove where the water started. This helps resolve disputes about repair responsibility.
New Homeowners and Sellers
Did you just buy the house? Check your seller’s disclosure. Also, review your roof inspection for home purchase documents to see if the inspector noted any shingle seal strip failure or vent stack collar issues. If you are selling, we offer a roof inspection checklist for sellers to ensure your transaction goes smoothly.
The Texas Pro Remodeling Roof Inspection Process
When you call us, we follow a strict roof inspection walk-through aligned with NRCA (National Roofing Contractors Association) and InterNACHI (International Association of Certified Home Inspectors) standards. Here is what you can expect during a roof inspection:
- Scope & Steps: Our roof inspection steps include a full exterior check and an attic interior check. We determine the roof inspection scope based on your needs (leak finding vs. routine maintenance).
- Storm Damage: We look for storm damage evidence like hail spatter marks, wind uplift, and flashing uplift. We check if shingles show fastener back-out or exposed nail heads.
- Technology: We use drone roof survey technology for steep roofs and infrared camera tools for thermal anomaly mapping.
- Report: You get a full roof inspection findings summary with annotated findings. This includes roof inspection photos and measurements, and a clear repair priority list.
We also look for mold-like growth on sheathing and attic condensation signs. This helps us assess your overall ventilation balance. A good roof saves on your utility bills with proper airflow to your attic.
Next, we inspect the critical hardware on your roof, including every skylight curb, drip edge, and gutter apron. Major manufacturers like GAF, Owens Corning, and CertainTeed require these specific components to be in good shape to maintain warranty compliance.
Final Thoughts
Water damages your home quickly. By spotting the signs early, whether it’s rafter staining in the attic or shingle blistering outside, you protect your investment. Keep your eyes open, check your attic, and manage your drainage.
If you need a roof certification letter request, a roof inspection estimate for repairs, or just peace of mind, contact Texas Pro Remodeling. We serve Dallas, TX, and the surrounding area with honest, thorough inspections.
Frequently Asked Questions (FAQs)
How do I find a leak on a flat roof?
Flat roofs often suffer from ponding on low-slope roofs. Look for cracks in the coating or seams that have lifted. Membrane seam separation is a common issue here.
Does insurance cover my roof leak?
Insurance usually covers sudden damage, like a storm knocking a tree onto your roof. It typically denies claims for wear and tear, like an old pipe boot or lack of maintenance.
How often should I inspect my roof?
We recommend a seasonal roof inspection twice a year, usually in the spring and fall.
Can I fix a leak myself?
Small fixes like replacing a vent stack collar or clearing a blocked soffit intake are DIY-friendly. However, for step flashing gaps or valley metal condition issues, you need a pro to ensure it is watertight. Identifying roof leaks is the first step. Fixing them permanently is ours.
How much does an inspection cost?
We offer competitive roof inspection pricing. For many homeowners, we may even have a free roof inspection offer (lead gen) available. Contact us for a specific roof inspection quote.